Facade
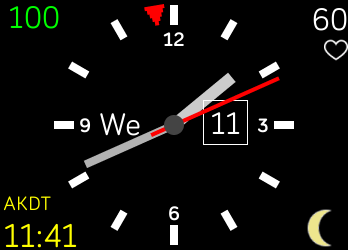

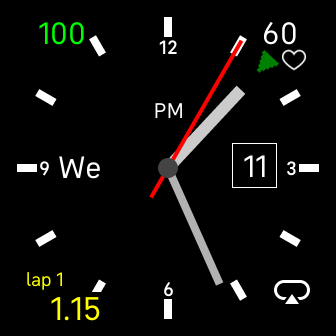
Note the red or green triangle on the outer edge of the dial. This triangle marks the hour hand position for the second time zone (or the first time zone if there is no second timezone selected). This triangle will be red to indicate AM and green to indicate PM. For example, the clock face on the left shows the local time of 1:30 and the Alaskan Daylight time of 11:41AM.
Time zone 1 is always the main analog clock in the center of the display. If a second timezone is selected then that hour of that timezone is shown by the triangle on the edge of the face and, optionally, it is also displayed as a digital clock in the lower left hand corner of the display. Timesones can be selected from one of 34 cities, 198 countries, or custom timezones can be specified. Note that this second timezone can also act as a chronograph (tapping on the second timezone brings up the chronograph configuration page where it can be enabled/disabled/set).
Tapping on the current date (the number in the square box on the right hand side of the display) will bring up a calendar showing the current month. Events can be added to this calendar and it is possible to scroll through it by month or year.
Tapping on the center of the watch turns the face into a flashlight (all be it a rather dim one). Tapping the center again brings back the watch face. Note that while the chronograph is enabled tapping the battery level will turn on the flashlight.
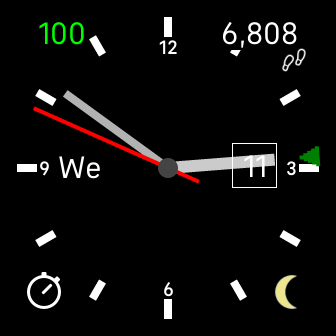
The bottom right icon changes to show the phase of the moon. Tapping this icon brings up configuration pages for choosing time zones, setting custom time zones, (and setting the watch hands to rotate counter clockwise).
Battery percentage is displayed in the upper left corner and the current heart rate or step count is displayed in the upper right corner.
You can obtain this watchface from the Fitbit Gallery or by going to this direct link.
Facade is licensed under the GPL V3.0. The latest source tree is available for browsing here and tarballs for the latest and older versions are here:
Note that the source tree is exactly the same for for all supported devices but Fitbit, in their infinite wisdom, has decided to create 2 incompatible SDKs. SDK4 must be used to create binaries for the Ionic, Versa, Versa 2, and Versa Lite while SDK5 must be used to create binaries for the Sense and Versa 3. The source tree contains package4.json and package5.json files for both SDKs, just rename either file to package.json and you can create the appropriate binary.
Although the flashlight is rather dim you'd be amazed at how helpful it is when you're stumbling around a strange hotel room in the middle of the night trying to not wake your spouse.
Note that the chronograph function, when enabled, pre-empts a tap to the center of the watch. In this mode just tap on the battery level indicator and the flashlight will be enabled. Tapping the center of the watch face while the flashlight is on will always turn the flashlight off. This means that the chronograph can only be stopped when the flashlight is off.

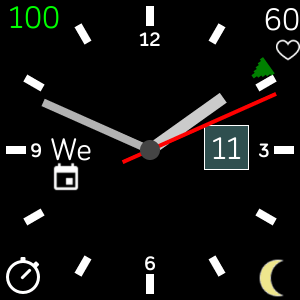
Facade has the ability to track calendar events and give an alarm (haptic vibration and visual icon) when an event is imminent. The above screen shots show, on the left, a big icon under the 12 indicating an alarm for an upcoming event (while the big icon is displayed the watch will cause a 2 second haptic vibration that repeats every minute until dismissed). Tapping the big icon will dismiss the alarm and show the screen on the right (with a small icon under the 9 indicating that the event has not ended yet). Note that both icons will disappear one the event ends.
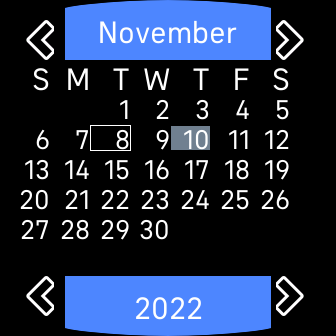

Tapping on the date on the main watch face brings up a month calendar, as shown by the picture on the left above. The current date is highlighted by a square and any dates that have an event are highlighted with a gray background.
As you might expect, tapping on the arrows next to the month name will scroll back and forth a month at a time while tapping on the arrows next to the year will scroll back and forth a year at a time. Tapping on the year itself will reset the calendar to the current date (note that the calendar shows the last month viewed whenever it is invoked from the watch face so being able to reset the calendar date is important).
Tapping on the month name at the top will go back to the watch face while tapping on the year at the bottom will display the month for the current day.
Tapping on a day of the month will bring up a event details page showing events for that day, as shown by the picture on the right above. Events can be added/updated/deleted from this page. Note that there are arrows next to the New button. If there are more events than can be displayed on the page then tapping on the down arrow shows subsequent events for the day while tapping on the up arrow shows prior events. These arrows are only displayed if needed.
Note the arrows next to the day of the month at the top of the page. Tapping on those arrows allows you to step one by one through the days of the month (acurately tapping a specific day in the month display is hard on a small watch so you can just tap on a day close to what you want and then scroll to the day you really wanted).

Tapping on the New button brings up the event detail page where you can edit the start time for an event (the At field), the duration of the event (the for field), an alarm before the event (the alarm field), or the name of the event. Tapping on the Event button at the top will discard changes and return to the events display. Tapping on the Delete button will delete this event (applies to an edit operation, does the same thing as tapping on the Event button for a new event) while tapping Save will save this event.
Tapping on the At (the time that the event starts), the for (the length of the event), or the alarm (the time before an even when an alarm is raised) numbers brings up a page where you can change those times. Cancel will discard this event while Save will save the event. (Remember to tap the save button, tapping on the event button at the top will also discard the event if save is not tapped.)

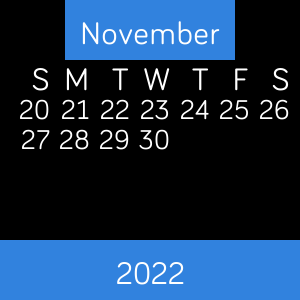
There is just no way fit 6 calendar lines (in a readable font size) on the smaller screens of these watches. The calendar function deals with this by spliting the month display into 2 halves, the first 3 weeks of the month and the last 3 weeks of the month. Tapping on the day of the week header line (just below the month name button) toggles the display between these two halves.
Another, minor, change is that the events detail page can only display 3 events at a time (rather than the 4 events shown in the Sense events detail page).
Note that the calendar pages for the Ionic/Versa
don't have arrows next to the month name or the
year.
There just wasn't enough space to squeeze support
for those buttons into the complex calendar display.
Instead,
tapping on the year button at the bottom
of the calendar page brings up the following page:
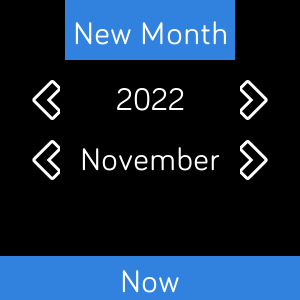
This new page provides scrolling buttons for the year and the month. Scroll through the year and month until you find the specific month you are interested in and then tapping on the New Month button will bring up a calendar display for that month. Tapping the Now button resets this display to the current year and month.
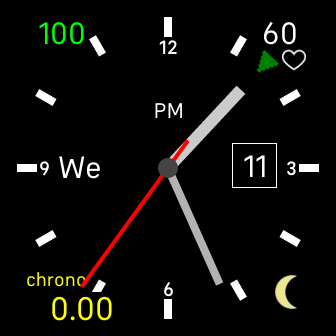
Facade has a built in chronograph that can operate as either an up counting stopwatch or as a down counting timer. Tapping the Timezone 2 area brings up the configuration page for the Chronograph. When the Chronograph is enabled the second timezone display on the main face now displays a timer and some of the buttons on the main face change their meaning. Specifically:
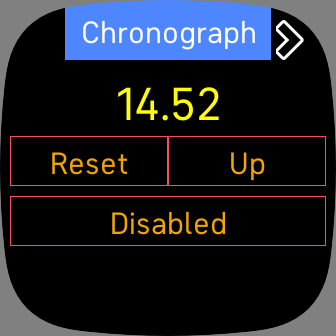
The main status page for the chronograph. The chronograph can be in one of two different states:
The number at the top is the current time value of the chronograph (in hundredths of a second). Tapping this number (in Timer mode only) brings up the Time set page which is used to set the start value for the timer.
Tapping the Reset button resets the time value, setting it to 0.00 in stopwatch mode or setting it to the start value in timer mode.
The Up/Down button selects the mode of the chronograph, either Up for stopwatch mode (counts up from 0) or Down for timer mode (counts down from a preset value set by the Time set configuration page).
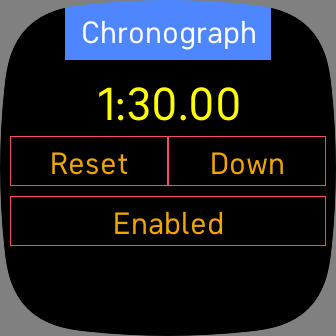
The Disabled/Enabled button at the bottom shows the state of the chronograph, either enabled or disabled. Tapping this button changes the state of the chronograph.

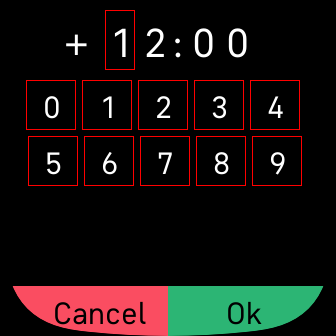
This page has a timer start value at the top and has a field of digits from 0 to 9, a Cancel button, and an Ok button. One of the digits in the time value is highlighted with a red square aroud it. Pressing a timer start value digit changes the highlight to that digit. Pressing one of the numbers 0-9 changes the highlighted digit and moves the highlight to the next digit. Pressing Cancel discards the changes and returns to the prior page. Pressing Ok saves the time value and returns to the prior page.
Be aware that the Time set value on this page changes the time value on the main status page in a rather confusing manner. The problem is that this value is displayed in seconds while the time value on the main status page is displayed in hundredths of a second. Settings this value to 1:30, representing 1 minute and 30 seconds, will display on the status page as 1:30.00, representing 1 minute and 30 seconds and 00 hundredths. Confusing but, given the layout constraints of a small watch face, it's the best solution I could think of.
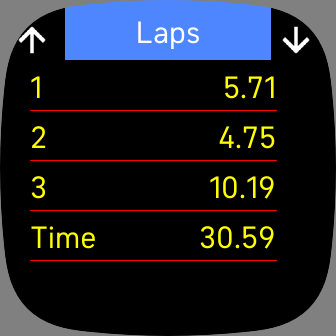
Tapping the right arrow on on the Status page (when in Stopwatch mode) brings a page showing the lap counters. The individual laps show the time since the prior lap while the Time value at the bottom shows the entire elapsed time.
In summary, presssing the left/right buttons at the top of the these pages cycles through the configuration pages in this order (starting from the Configuration):
Custom TZ <-> Configuration <-> Select TZ

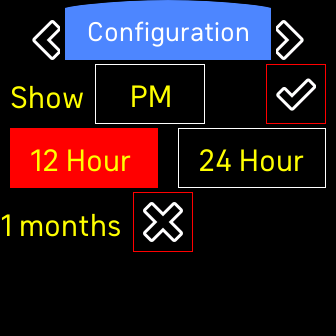

This page controls the AM/PM style and shows how many months have events scheduled and gives the ability to clean out events.
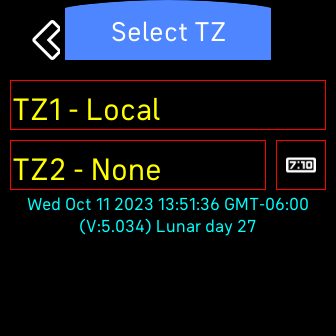
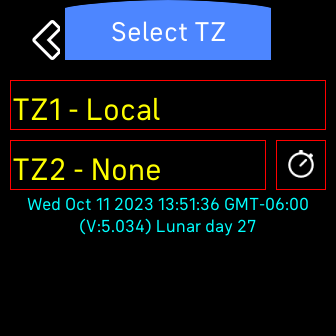
This page selects the two timezones that are displayed on the face of the watch. Each of the TZ buttons shows the currently selected timezone and, pressing that button, brings up a page that will select the timezone from a city/country list. The icon on the right of the TZ2 entry controls what is displayed in the Timezone 2 area of the main face. The stopwatch icon causes that area to always show the chronograph information. The digital time icon causes that area to act as a digital clock for the second timezone as long as the chronograph function is disabled.
Just for informative purposes this page also shows the current day/time (with GMT offset) and the exact (within the limits of the moon phase calculations detailed in the section Moon Phase Inaccuracies) day of the current lunar cycle.
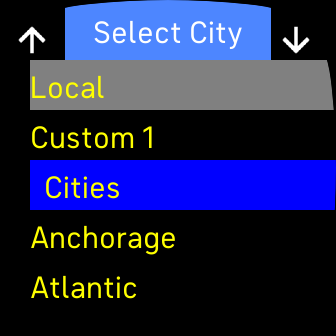
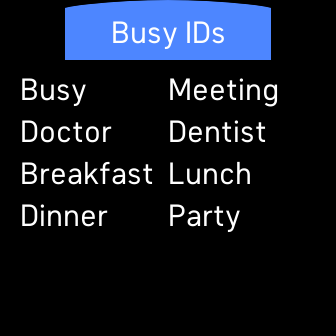
This page is used to select the time zone that is displayed by the digital display. Scroll up and down through the list by tapping on the up or down arrow at the top of the page. When you find the timezone you desire tap on it and it will be highlighted in gray to indicate that this is now the time zone used by appropriate time display.
At the top of the list are 2 special entries:
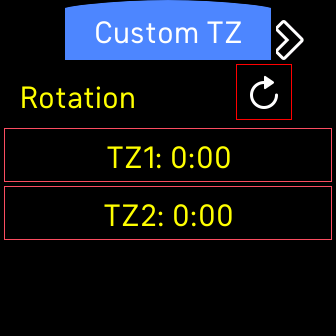
The main purpose of this page is to set custom timezones. Because of size constraints (this was the only screen with enough empty space to fit this control) there is also a control that sets the direction for the hands on the analog face. Tapping the circular arrow causes the analog clock hands to rotate in the indicated direction, clockwise or counter clockwise. Fortunately, the default is clockwise but, if you really want to, you can change it to counter clockwise. (It'll probably give you a headache if you leave it on counter clockwise but feel free to go wild with this.)
Below the rotation control there are 2 buttons. one for the Custom TZ 1 and the other for the Custom TZ 2. Tapping either of these 2 buttons brings up a time setting page.
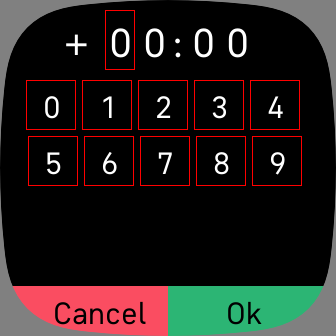
This page has a time value at the top and has a field of digits from 0 to 9, a Cancel button, and an Ok button. One of the digits in the time value is highlighted with a red square aroud it. Pressing a time value digit changes the highlight to that digit. Pressing one of the numbers 0-9 changes the highlighted digit and moves the highlight to the next digit. Pressing the +/- character changes the sign of the time value. Pressing Cancel discards the changes and returns to the prior page. Pressing Ok saves the time value and returns to the prior page.
Unfortunately Fitbit, in their infinite wisdom, decided to change the SDK for Versa 3 & Sense devices in a way that is incompatibile with the SDK used for Ionic and older Versa models. In the interests of standardization Facade has decided to go with the new SDK design (it makes it much easier to use the same code base to support all Fitbit smart watches). The problem is that the Versa 3 & Sense devices do not support vertical scrolling for watch faces. This means that the configuration pages:
This is a cumbersome design where scrolling views and tumblers would be much more appropriate but who am I to argue with Fitbit.
Also, the change in the SDK required many internal changes to the code in order to get this watch face working on the new devices. Users don't care about these changes but, trust me, the developer is still bitter about them.
For those that care about time zones you can explicitly set the time zone for the analog face and it will be displayed correctly. Facade has to use a rather baroque technique to display an explicit time zone. First the GMT offset is applied to the local time to get UTC time. Then, the appropriate GMT offset for the desired time zone is applied to that UTC time in order to get the time in the desired time zone.
This means there's no way to automatically determine if daylight savings is in effect for the local time zone. Even with the date there's no way to reliably go from a GMT offset to a time zone. Consider Eastern European Time (EET - offset of GMT+02) but observes daylight savings time (EEST - offset of GMT+03). Moscow (MSK - offset of GMT+03) does not observe daylight savings time. If the Fitbit returns a time of 00:00:00 GMT+03:00 on June 1 is that MSK or EEST - there's no way to know.
Having said that, for explicitly specified time zones it is possible to use the date to determine if daylight savings time is in effect. Facade will do this for US and EU times (AKST/AKDT, PST/PDT, MST/MDT, CST/CDT, EST/EDT, GMT/BST, CET/CEST, EET/EEST). If I get enough requests I can consider doing daylight savings time for other time zones but dealing with all the special cases (who's brilliant idea was it to use the last Sunday of a month, that is hard to determine) for all the time zones gets really messy really quickly (just getting the US & EU was hard enough).
There are two issues that make identifying the correct moon phase extremely hard:
Having said that, Facade attempts to be fairly accurate. It calculates the current lunar day by comparing the current date to the reference date of the new moon on January 1, 1900, modulo 29.5(30588853). This calculation seems to be fairly accurate (it is certainly correct for the 44,206 days from the new moon on January 1, 1900 to the new moon on January 12, 2021). This results in a lunar day of 1 - 29 (actually, some months it turns out to be 1-30 because of roundoff with the lunar period).
The lunar day is then converted to one of 8 icons (representing the moon waxing from new moon to full moon and then waning from full moon to new moon). This conversion is offset by 2 days so that the new moon icon appears for the 2 days before the new moon, the actual new moon itself and then 1 day after the new moon.